Oil change completed
A couple of weeks ago I left you with a cliff hanger - I had found a vacuum pump extractor that worked, I had successfully removed the extra oil that I had accidentally put in, but the glow plug solenoid was no longer working.
Last weekend I finally got the chance for a good run at finishing the job. The first task was to find out why the solenoid wasn't firing. This ended up taking me a couple of hours, not because it was difficult, but because of the time it took me to get all the necessary bits and pieces together.
My multimeter has normal probes, so to test that the push switch is working, you've got to press the probes against the two contacts on the back of the switch and then press the switch itself. This requires 3 hands! The answer was to get some croc clips and attach them to the probes. The problem was, I didn't have any and no shop in Scarborough had them either. I ended up having to drive out to Halfords to get some and even then they were hidden behind some other stuff, so well that even the shop assistant couldn't find them!
Anyway, once I had them it took about 10 minutes to figure out it was just a bad connection at the spade connector which attaches to the solenoid terminal. A quick rub of the terminal and a satisfying clunk was once again heard on pressing the glow plug heater switch.
15 seconds of glow plugs and the engine fired up straight away. I ran it for a good 10 minutes to get the oil warmed up and then started pumping.
What no-one tells you about removing the oil via the dipstick tube is that it takes hours! I must have been pumping and waiting, pumping and waiting for a good 2 hours. In the end I had about 4 litres of oil in the vacuum pump container. Apparently the BMC 1.5 holds 4.5l so this is probably as good as you can get without removing the sump plug.
My lovely wife had joined me on Alison, bringing wine and snacks so at least the boredom was alleviated, but by the time the pump finally sucked the last drop it was getting chilly so we both decided to go back home for tea (again kindly cooked by my wife).
The next day I had a few chores to do so it was afternoon by the time I got onto Alison again. The next stage was to replace the oil filter. I took the engine cover off completely so I had easy access to everything and put down an oil absorbent pad to catch any drips. I have a filter wrench that I got years ago so I thought I would use that to remove the filter. I wrapped the rubber strap around it but as soon as I tensioned it up it snapped!
More in hope than anything else I checked to see if I could unscrew the filter by hand. To my amazement it moved really easily - this is literally the first thing I've done on Alison that has turned out easier than I expected!
A Youtube video I watched on changing the oil filter in boats recommended enfolding the filter in a ziplock bag as you are unscrewing it so you can wrap it up and seal it as soon as you take it off. I must say this worked an absolute treat; I only had one solitary splash of oil on the absorbent pad at the end of the operation.
As recommended on Youtube, I smeared the rubber seal on the new filter with fresh oil and screwed it on in place of the old one. That done it was time to refill the engine with new oil.
I put in about half what I thought was needed and checked the level with the dipstick. To my horror it was way above maximum. My first thought was, "Oh no! Now I'm going to have to spend the next 2 hours pumping cold oil out of the engine again!". My second thought was, "Hang on, the oil filter holds about a pint (0.5l) of oil. Maybe, if I start the engine and run it for a few seconds, the level will settle down. I gave this a go and sure enough, the second check of the dipstick showed that the oil level was exactly half way between MIN and MAX.
I put everything back together and ran the engine for a good 10 minutes. I might have mentioned this before but it's very important to have the engine in gear when you're running it as it doesn't do them any good to be run with no load (accelerates piston wear apparently).
While it was running I checked the oil pressure gauge (steady at 4.0kg/cm3) and the temperature gauge (which I had managed to get working by taking all the connections off and putting them back on again - 95degrees C) and patted myself on the back for another job (and a whole lot of learning) done.
I poured the old oil from the vacuum pump into the empty oil can (it seems strange to call them cans when they are plastic bottles but it feels more wrong to call them bottles of oil) and took both oil and filter away for recycling the next time I go to the dump.
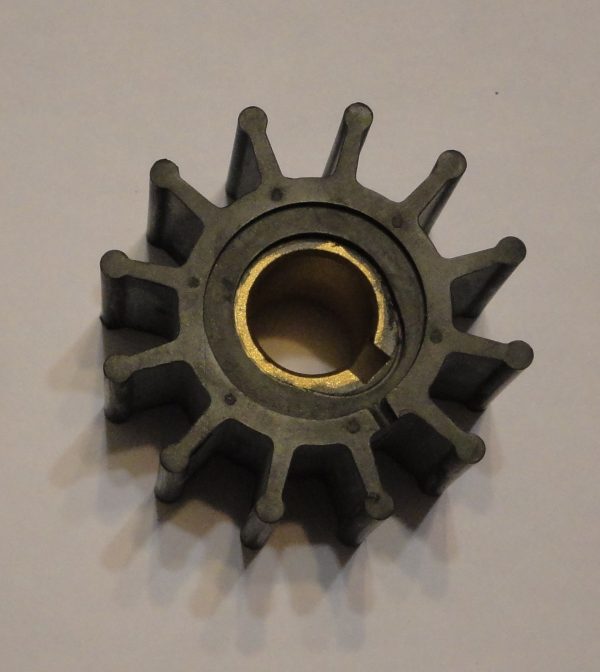
That's all the annual maintenance done for this year. I've got one last thing to do before I'm happy that she's good to go, which is to check the impeller. For those of you who don't know, this is the key component of the pump that draws seawater (known as raw water) into a heat exchanger where it cools the water that runs around the engine. The impeller is made of rubber and looks like a wheel with lots of spines sticking off it. Unfortunately, these spines often break off which will eventually result in pump failure and the engine overheating. In order to check the pump I need to take the cover off, which involves replacing the paper gasket. The blocker is that the only spare I have, which I have inherited from Arthur, is broken so I have to order some new ones. I'll try to get this sorted during the week and then give it all a go this weekend.
Last weekend I finally got the chance for a good run at finishing the job. The first task was to find out why the solenoid wasn't firing. This ended up taking me a couple of hours, not because it was difficult, but because of the time it took me to get all the necessary bits and pieces together.
My multimeter has normal probes, so to test that the push switch is working, you've got to press the probes against the two contacts on the back of the switch and then press the switch itself. This requires 3 hands! The answer was to get some croc clips and attach them to the probes. The problem was, I didn't have any and no shop in Scarborough had them either. I ended up having to drive out to Halfords to get some and even then they were hidden behind some other stuff, so well that even the shop assistant couldn't find them!
Anyway, once I had them it took about 10 minutes to figure out it was just a bad connection at the spade connector which attaches to the solenoid terminal. A quick rub of the terminal and a satisfying clunk was once again heard on pressing the glow plug heater switch.
15 seconds of glow plugs and the engine fired up straight away. I ran it for a good 10 minutes to get the oil warmed up and then started pumping.
What no-one tells you about removing the oil via the dipstick tube is that it takes hours! I must have been pumping and waiting, pumping and waiting for a good 2 hours. In the end I had about 4 litres of oil in the vacuum pump container. Apparently the BMC 1.5 holds 4.5l so this is probably as good as you can get without removing the sump plug.
My lovely wife had joined me on Alison, bringing wine and snacks so at least the boredom was alleviated, but by the time the pump finally sucked the last drop it was getting chilly so we both decided to go back home for tea (again kindly cooked by my wife).
The next day I had a few chores to do so it was afternoon by the time I got onto Alison again. The next stage was to replace the oil filter. I took the engine cover off completely so I had easy access to everything and put down an oil absorbent pad to catch any drips. I have a filter wrench that I got years ago so I thought I would use that to remove the filter. I wrapped the rubber strap around it but as soon as I tensioned it up it snapped!
More in hope than anything else I checked to see if I could unscrew the filter by hand. To my amazement it moved really easily - this is literally the first thing I've done on Alison that has turned out easier than I expected!
A Youtube video I watched on changing the oil filter in boats recommended enfolding the filter in a ziplock bag as you are unscrewing it so you can wrap it up and seal it as soon as you take it off. I must say this worked an absolute treat; I only had one solitary splash of oil on the absorbent pad at the end of the operation.
As recommended on Youtube, I smeared the rubber seal on the new filter with fresh oil and screwed it on in place of the old one. That done it was time to refill the engine with new oil.
I put in about half what I thought was needed and checked the level with the dipstick. To my horror it was way above maximum. My first thought was, "Oh no! Now I'm going to have to spend the next 2 hours pumping cold oil out of the engine again!". My second thought was, "Hang on, the oil filter holds about a pint (0.5l) of oil. Maybe, if I start the engine and run it for a few seconds, the level will settle down. I gave this a go and sure enough, the second check of the dipstick showed that the oil level was exactly half way between MIN and MAX.
I put everything back together and ran the engine for a good 10 minutes. I might have mentioned this before but it's very important to have the engine in gear when you're running it as it doesn't do them any good to be run with no load (accelerates piston wear apparently).
While it was running I checked the oil pressure gauge (steady at 4.0kg/cm3) and the temperature gauge (which I had managed to get working by taking all the connections off and putting them back on again - 95degrees C) and patted myself on the back for another job (and a whole lot of learning) done.
I poured the old oil from the vacuum pump into the empty oil can (it seems strange to call them cans when they are plastic bottles but it feels more wrong to call them bottles of oil) and took both oil and filter away for recycling the next time I go to the dump.
That's all the annual maintenance done for this year. I've got one last thing to do before I'm happy that she's good to go, which is to check the impeller. For those of you who don't know, this is the key component of the pump that draws seawater (known as raw water) into a heat exchanger where it cools the water that runs around the engine. The impeller is made of rubber and looks like a wheel with lots of spines sticking off it. Unfortunately, these spines often break off which will eventually result in pump failure and the engine overheating. In order to check the pump I need to take the cover off, which involves replacing the paper gasket. The blocker is that the only spare I have, which I have inherited from Arthur, is broken so I have to order some new ones. I'll try to get this sorted during the week and then give it all a go this weekend.

Comments
Post a Comment